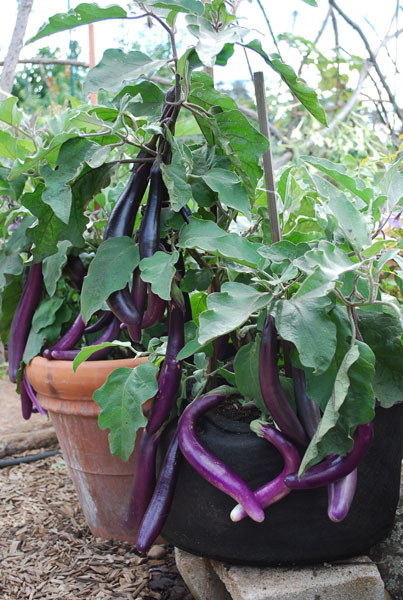
Container Gardening Drainage
|
|
is Critical for Healthy Vegetables © Steve Masley…Click IMAGE to Enlarge |
Poor container gardening drainage is the number one problem in vegetable container gardening. If water drains through your container garden soil like a sieve, your vegetables dry out too quickly, and have to be watered constantly just to keep them alive. But draining too slowly can be worse.
Vegetables need air around their roots, not just water. They can survive brief periods of flooding, but if the roots sit in water continuously, they use up all the oxygen. Air-breathing soil organisms die or go dormant, and anaerobic organisms take over.
Then the soil Bad Boys—anaerobic bacteria and pathogenic fungi—feast on the roots of your dying vegetables.
If a potted plant is stunted, weak, or feeble, root rots are the prime suspect, and poor container gardening drainage is the likely source of the problem.
Container Garden Soil
|
Purchasing Organic Potting Mix
Make Your Own Potting Mix
|
Reusing Potting Soil
Troubleshooting Container Gardening Drainage Problems
Container Garden Soil
Container gardening drainage depends mainly on the potting mix you use, but the type of container also has some effect.
Effect of Container Type on Container Gardening Drainage
In terra cotta, ceramic, and especially single-walled plastic pots, the sides of the pot can heat up, causing the potting soil to dry and shrink away from the sides of the pot.
When you water the plant, all the water rushes down through the gap between the potting soil and the pot, and out the bottom, instead of soaking into the potting mix. See Troubleshooting for fixes for this problem.
Is Drain Rock Necessary? It used to be a standard recommendation in container gardening books that you add an inch or so of drain rock to the bottom of the pot, so the roots wouldn't sit in water.
This was before people understood the physics of water movement in pots. Gravity draws water downward in pots, but at the bottom of the pot there's a point where gravity and capillary attraction, which draws water upward between soil particles, balance.
This is the soil saturation zone, where root rots can be a problem if your soil medium drains poorly. It was once thought that adding a layer of drain rock eliminated this problem. It doesn't, it just pushes the problem up above the layer of drain rock. The solution is to make sure you build adequate drainage into your potting mix.
While a layer of drain rock is counterproductive, it is useful to block drain holes with small rocks to prevent soil from flushing out.
One advantage of Smart Pots—breathable fleece pots—is that the sides don't heat up as much, so the soil is less likely to dry and pull away from the sides, creating a channel for water to rush down. There’s free air exchange all around the pot, so root rots don’t set in.
Effect of Potting Mix on Container Gardening Drainage
Container garden soil has to balance the competing needs of letting excess water drain, and holding enough water in the mix for plants to draw on through the day. Container garden soil mixes should also be as light as possible.
Can Garden Soil Be Used for Container Vegetable Gardening?
|
Container Gardening Pages |
|---|
|
|
|
|
|
|
|
|
|
|
|
|
Only if you have a nice, free-draining sandy loam soil.
Soil is composed of particles of sand, silt, and clay. Organic matter makes up only 5% of the soil volume in most garden soils. Even in a really good organic garden, the soil contains only 10% organic matter.
Sand is heavy, but still useful for container gardening drainage.
Silt and clay particles, on the other hand, settle and pack too tightly in containers. Silt tends to form hard surface crusts that make it difficult for water to penetrate. Clay settles to the bottom of the pot, creating container gardening drainage problems and root rots.
Container Gardening Drainage is All About Particle Size
The physical properties of the potting soil—the mix of particle sizes and shapes, and the way they stack in the pot—is the main determinant for container gardening drainage. A mix of particle sizes and shapes is better than particles of the same size or shape.
Organic and conventional potting soils with a similar mix of particle sizes and shapes will drain at the same rate, at least at first.
Where there’s a BIG difference between conventional and organic potting mixes is in moisture retention—the amount of moisture the container garden soil holds for plants to draw on through the day.
Conventional potting mixes are sterilized, then nitrate salt or chemical urea fertilizers are added to feed plants. The expectation is, you’ll feed your vegetables every few weeks with additional nitrate salt fertilizer.
In organic potting soils, the same processes that work in organic soil in the field are put to work in your potted vegetable garden.
Organic container garden soil is alive, it brings diverse populations of beneficial bacteria and fungi into your container garden. Concentrated organic soil amendments—like alfalfa meal, worm castings, or feather meal—are built into the container garden soil, where they break down slowly over time, ‘feeding the soil to feed the plants’.
In the process, they build an ecosystem in a pot, creating a water-absorbing web of bacteria and fungi between the soil particles. The biomass of the potting soil absorbs water and nutrients for your vegetables to draw on through the day.
These beneficial soil organisms also attack or compete with disease-causing organisms that would otherwise infect your vegetables.
Chemical fertilizers inhibit the growth of beneficial fungi and reduce the water-holding capacity of container garden soil.
Look for OMRI-certified products to avoid these chemicals and make sure the ingredients are organic.
Organic potting mixes can be expensive, so if you’re planning a large container vegetable garden, it’s cheaper to buy raw materials in bulk and make your own potting soil.
Top of Page
|
Container Soil
|
Do-it-Yourself Potting Mix
Reusing Potting Soil
|
Troubleshooting Drainage Problems
Purchasing Organic Potting Soil
Most big-box stores and garden centers have some kind of organic potting mix available, usually in 12-quart bags, but you get a better deal on 1.5 cubic foot bags, if they’re available.
If it’s cheap, it’s probably heavy on the wood fiber, and not the best bet for growing vegetables in containers.
Foxfarm’s Ocean Forest Potting Mix is pricy, but good—and well worth the price if you’re growing tomatoes in pots, or growing peppers or eggplants in containers. I’m a tightwad, but I’ve bought a bag or two every spring for the last 12 years, for potting up tomatoes, peppers, chiles, and eggplants—nightshades thrive in this mix.
Shipping individual bags is expensive, so online prices for Ocean Forest Potting Mix are outrageous. I’d offer a link if prices were reasonable, but it’s better to look for a Foxfarm retailer near you.
Make Your Own Potting Soil
Or, you can buy the basic materials in bulk, and make your own potting soil. You can buy some of these materials at big-box stores or nurseries, but you’ll usually get better price and selection at a landscaper’s soil yard that sells retail. You may have to shovel them into bags from a pile or bin, but you’ll get better materials and save a few dollars a bag.
There are dozens of formulations for “soil-less” mixes. Most involve variations on 4 primary components:
- Coarse Materials
- Water-Retaining Materials
- Bulk Nutritional Materials
- Concentrated Organic Soil Amendments
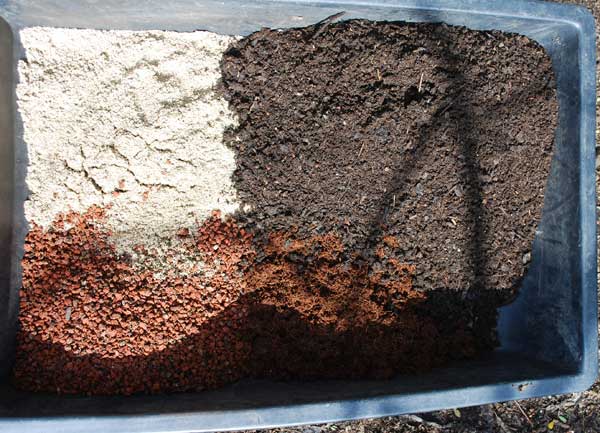
| Basic Potting Soil Recipe …Click IMAGE to Enlarge | |
|
|
|
|
Top of Page
|
Container Soil
|
Do-it-Yourself Potting Mix
Reusing Potting Soil
|
Troubleshooting Drainage Problems
Coarse Materials
Coarse Materials like perlite, horticultural lava rock, and/or coarse sand, are critical for container gardening drainage. A mixture of coarse materials is usually better than any single coarse material.
Perlite and small horticultural lava rock are small, porous pebbles. They create air spaces in the potting mix, and the pores also soak up moisture that the roots of your plants can draw on as the potting soil dries out.
Pea gravel will also improve container gardening drainage, but hard rocks are heavier, and lack these water-absorbing pores.
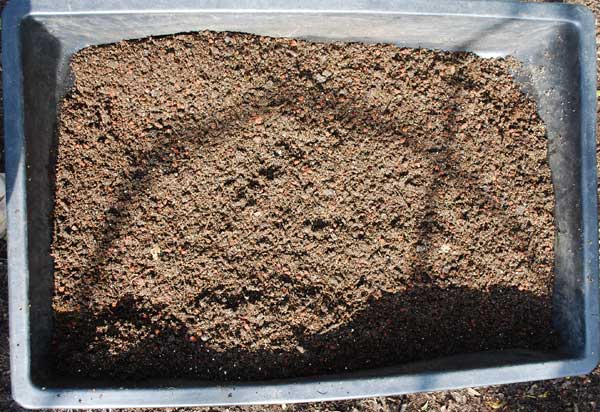
Water-Retaining Materials
|
|
© Steve Masley…Click IMAGE to Enlarge |
Water-Retaining Materials, like coir (coconut husk fiber) or peat moss. Coir is superior for container garden soil, but peat moss holds a slight advantage for acid-loving plants. The problem with peat moss is that it becomes hydrophobic when it dries out—it actually repels water.
Coir is always hydrophilic—water-absorbing—even when it dries out. Drying out is a hazard with any container garden soil, so coir is usually the best water-retaining material to use.
5 coir bricks, along with the other ingredients in the basic potting soil recipe (in proportion), will give you enough to make potting soil for a couple of 5-gallon pots, if you want to test it out.
Each coir brick soaks up 5 times its weight in water, and swells to more than double its size.
Vermiculite is a lightweight, fluffy mineral that holds moisture in potting soils and seed starting mixes.
It works very well for a season, but compacts over time and with handling, becoming dead weight in the container garden soil. I still use it for seed start mixes, but there are better alternatives for container gardens—especially if you’re planning on reusing potting soil.
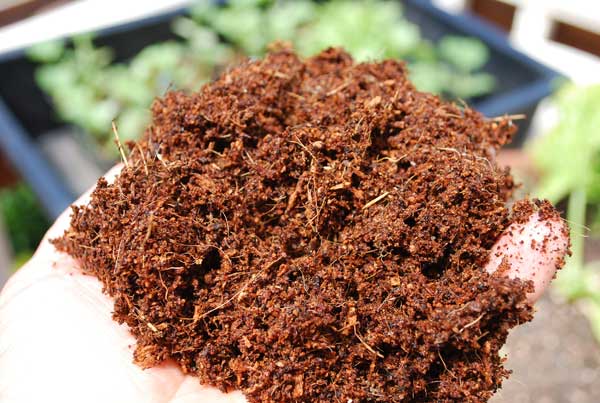
Bulk Nutritional Materials
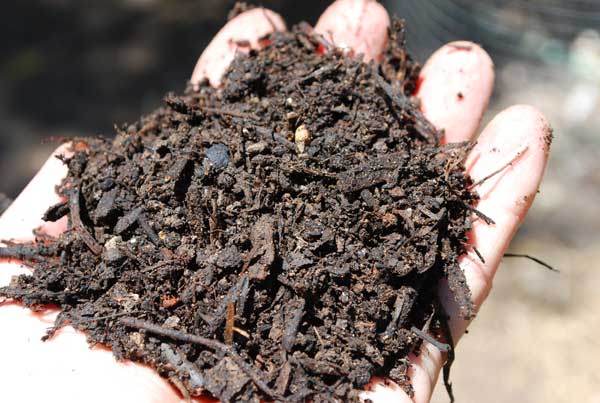
|
|
© Steve Masley…Click IMAGE to Enlarge |
Compost and worm castings don’t just add soil nutrients. They increase the biodiversity—and biomass—of a container garden soil. This improves its structure and water-retaining capacity without compromising container gardening drainage.
Concentrated Organic Soil Amendments
Concentrated Organic Soil Amendments are usually byproducts of meat, poultry, and fisheries operations. They’re added in small amounts to container gardening soil to fertilize your vegetables.
Vegetable-based amendments like alfalfa meal, soy meal, cottonseed meal, and kelp meal, work well when temperatures are in the 65-85° (18-30°C) range.
Animal-based organic soil amendments like feather meal, blood meal, fish meal, bat guano, seabird guano, and ground oyster shell (oyster shell flour) work in cooler weather and smaller quantities.
Greensand and soft phosphate (colloidal phosphate), are mineral nutrients that supply potassium and phosphate (respectively) for your vegetables over several years.
For details about these and other organic soil amendments, click Here.
Top of Page
|
Container Soil
|
Do-it-Yourself Potting Mix
Reusing Potting Soil
|
Troubleshooting Drainage Problems
Reusing Container Garden Soil
Like any farm soil, container garden soil becomes depleted with continual use, especially if you’re growing the same vegetables in it year after year.
The organic matter in the mix breaks down into finer and finer particles, creating compaction problems and container gardening drainage issues. There are a couple ways to address this.
Crop Rotation
If you plant the same crop in the same place year after year, soils are depleted, and pests and diseases build up in the soil.
Farmers practice vegetable crop rotation—moving crops so vegetables from the same plant family are not grown in the same place every year—to avoid depleting soils and building up pest and disease populations. (See How to Grow Vegetables for information on vegetable plant families.)
For example, they’ll plant a light feeder, like carrots, where they grew a heavy feeder, like tomatoes, the year before. Or they’ll plant a legume, like beans, to fix nitrogen and add free fertilizer to replenish what to tomatoes took out of the soil.
Crop rotation also works in a vegetable container garden or balcony farm, but sometimes, you don’t have much choice about where to put plants. If you have one choice sunny spot, that’s where you have to grow tomatoes or peppers.
On a balcony farm, if you can’t rotate the crop, rotate the potting soil.
Every spring, I rotate the soil from my salad table trays, where I grow lettuce, to the large pots I grow tomatoes, peppers, and cucumbers in. I use the soil from those pots in new salad trays.
Renewing Container Garden Soils
You can also renew container garden soils by adding fresh compost, worm castings, or composted manure whenever you plant a new crop. Replace 20-25% of the mix with fresh materials.
If the container soil is rootbound, use a hand trowel to loosen the mix in the pot, then break up the clumps with a garden claw or your hands. Pick out any large, coarse roots and compost them.
Small roots will break down in the potting soil.By combining these two practices—crop (or soil) rotation, and mixing in fresh compost—you can stretch the life of your container garden soil out for several years. But even with these measures, potting mixes can’t be used indefinitely.
After 6-7 years, if you notice the health and vigor of your vegetables declining, it may be time to replace your container garden soil and start anew.
Give the old potting soil to a friend with a garden—it’s an excellent soil amendment for improving the texture of garden soil, especially clay soil. You may be able to trade your old container garden soil for some good compost.
Top of Page
|
Container Soil
|
Do-it-Yourself Potting Mix
Reusing Potting Soil
|
Troubleshooting Drainage Problems
Troubleshooting Container Gardening
Drainage Issues
PROBLEM: Potting mix shrinks away from sides of pot, water rushes through gap and out the bottom of the pot, instead of sinking into soil.
This problem happens most frequently in terra cotta, ceramic, and single-walled plastic pots, where the sides heat up during the day, but it can happen in any type of container, especially with old potting mixes or rootbound plants. It’s made worse by haphazard watering, so making sure the plant gets regular water is part of the solution.
StopGap Solution: Use a hand cultivator to go around the inside edge of the pot, where the potting soil has pulled away from the pot. Claw to break up the crust. Push the loose material into the gap, and water. Water more frequently to help prevent a recurring problem.
Better Solution: Coir—ground coconut husk—is a great band-aid for container gardening problems. Rehydrate a brick, break it up, and spread a 1” layer over the surface of the pot. Press some down into the gap between the pot and the soil, but don’t pack it tightly. Go around the inside edge of the pot with a hand cultivator, clawing the moistened coir down into the surface crust. Water thoroughly.
Variation: Mix some coffee grounds into the coir. Coffee grounds are free organic fertilizer with an NPK of 2-0.3-0.3, and a slight acidifying effect on the soil. Use up to a cup for an 8” pot, 3 cups for a 5-gallon pot, and 4 cups for a 7-gallon pot.
Best Solution: Lay down a ½” layer of worm castings—preferably fresh, with a few small worms—then a 1” layer of rehydrated coir, with or without coffee grounds, as in the better solution above. Press some into the gap between the pot and the soil, but don’t pack. Cultivate lightly with a hand claw along the inside edge of the pot to mix the layers. Water thoroughly.
Top of Page
|
Container Soil
|
Do-it-Yourself Potting Mix
Reusing Potting Soil
|
Troubleshooting Drainage Problems
Growing Vegetables in Containers
|
Containers for Container Gardening
Choosing Container Vegetables
|
Fertilizing Container Vegetables
Temperature in Container Gardens
|
Salad Tables
|
SaladScapes


Copyright © 2009-2025, by Steve Masley, Grow-it-Organically.com
All rights reserved
![]()
HOME | About Us | Contact Us | Privacy
New! Comments
Have a question or comment about what you just read? Leave me a comment in the box below.