Setting Up a Worm
Composting System
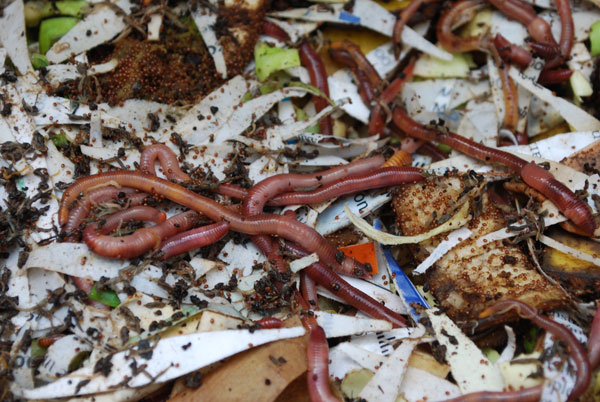
A worm composting system harnesses red compost worms, Eisinea foetida, and a contained forest floor ecosystem to convert kitchen scraps and shredded paper into worm castings, one of the best organic fertilizers you can get.
|
|
© Steve Masley…Click IMAGE to Enlarge |
Worm castings are a top-notch organic fertilizer for growing vegetables in containers. They have both fast- and- slow-releasing nutrients, but their main benefit is biological.
Beneficial bacteria and fungi are concentrated in the last chamber of the worm gut, and inoculate the worm castings as they pass through.
Organic soil amendments and potting mixes need the soil food web to break organic materials in the mix down into plant-usable nutrients.
Fresh worm castings—complete with worms and worm cocoons—are the best way to introduce this forest floor ecosystem to container gardens. I use worm castings in my container vegetable potting mixes, usually in the ratio of 10-20% by volume.
All of my houseplants, potted vegetables and salad table trays use red worms composting to cycle nutrients.
Worm Composting Bins
|
How a Worm Composting System Works
Starting a Worm Bin
|
Feeding Your Worms
Harvesting Worm Castings
| Troubleshooting Worm Bins

|
|
© Steve Masley…Click IMAGE to Enlarge |
Red Worm Composting Bins Help Reduce Your Carbon Footprint
A worm composting system gives even apartment dwellers a composting option.
In landfills, kitchen scraps are compacted, and the carbon in them produces methane, a potent greenhouse gas that traps 26 times as much heat as carbon dioxide. Much of the nitrogen, a valuable fertilizer, off-gasses as ammonia and is lost.
Red worm composting makes it easy to turn this problem into a solution.
A worm composting bin allows you to convert kitchen waste and shredded junk mail into a rich, odorless organic fertilizer for houseplants, vegetable container gardens, salad table trays, and balcony farms.
Some carbon dioxide is released as a waste product, but the amount is small, and it’s much less damaging than the methane that the same scraps would produce in a landfill. The nitrogen is recycled into vegetables and house plants.
Bins
|
How it Works
|
Getting Started
Feeding Your Worms
|
Troubleshooting
|
Harvesting Castings
|
Composting Pages |
|---|
|
|
|
|
|
|
|
|
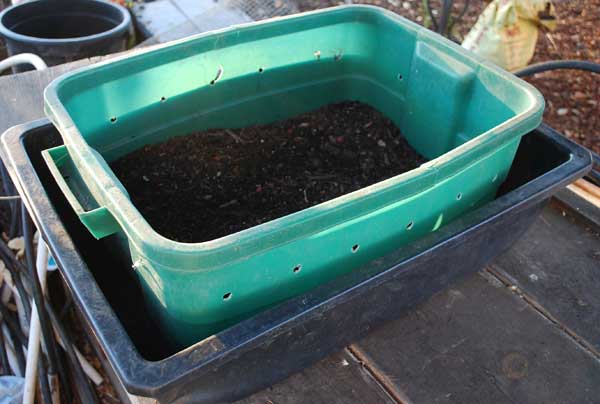
The most basic worm composting system is a simply a plastic tote with a snap-on lid, holes drilled in the bottom for drainage, and a few holes drilled in the sides for ventilation.
Rest the bin in a 24” x 18” (60 x 45 cm) plastic concrete mixing tray, purchased from the same hardware store you bought the tote from, to catch the leachate that drains from the bin.
|
|
© Steve Masley…Click IMAGE to Enlarge |
The earliest plastic tote worm bins—like the ones in mother of worm composting Mary Appelhof’s classic book, Worms Eat My Garbage
—didn’t have drainage holes in the bottom, so leachate collected inside and had to be drained off with a turkey baster inserted into the corner of the bin.
If the leachate wasn’t drained off occasionally, fluids would accumulate and the bottom of the bin would go anaerobic, producing odors and toxins that could eventually kill your worms.
Drilling holes in the bottom and allowing the leachate to collect in a tray below the bin solved this problem, but it can still be messy and cumbersome emptying the leachate, especially when there’s a lot of it.
Harvesting worm castings is also more problematic than it is with an upward migrating worm composting system.
The Best Worm Composting Bins are “Upward Migrating” Worm Composting Systems
Upward migrating worm composting bins like the Worm Factory 360 have a leachate collecting tray with a spigot at the bottom, and a series of stacking trays with grid bottoms above.
The grid bottoms allow worms to move from one tray to another, following food.
The 3-bin system at the right is a good, basic worm composting system for a small family. While cheaper versions are available, this one has a better lid that keeps out rain, and higher clearance under the leachate spigot, so you can fit a larger container under the bin.
If you need more capacity, you can order additional trays below. Some bins are also available in green and terra-cotta, instead of black.
Order Worm Bins, Red Compost Worms, and Worm Bin Supplies
The leachate is collected in a closed container below the trays, and the spigot makes it easy to drain this “worm tea” from the bins.
Diluted 50-50 with water, worm tea makes an excellent quick-release organic fertilizer for houseplants and container vegetable gardens.
An upward migrating worm composting system also simplifies harvesting worm castings.
When the first tray is nearly full, simply add bedding and food to the tray above, and most of the red compost worms will follow the food and migrate up into the new tray, allowing you to harvest the castings from the first tray.
Bins
|
How it Works
|
Getting Started
Feeding Your Worms
|
Troubleshooting
|
Harvesting Castings
How a Worm Composting System Works
|
|
© Steve Masley…Click IMAGE to Enlarge |
Although red compost worms are the main players in any worm composting system, a fully functional worm composting system relies on other compost critters, not just red wriggler worms, to break down wastes.
Red compost worms don’t really eat the kitchen scraps you put in the bin, they eat the bacteria and fungi that thrive in the mixture of bedding and food scraps that you provide.
Red Compost Worms are Part of the Forest Floor Ecosystem
(Click IMAGE to Enlarge) |
|
|
|
|
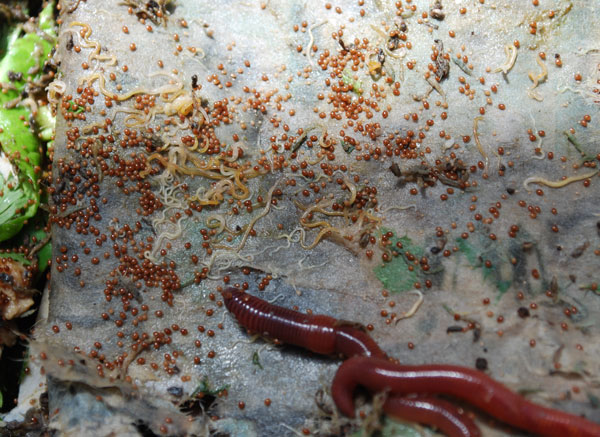
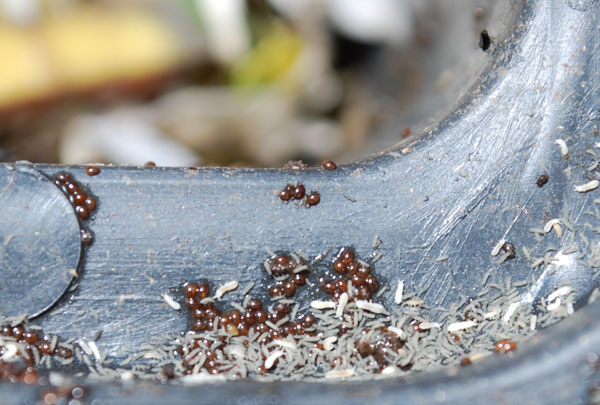
Forest floor denizens like millipedes, orabitid turtle mites, and other “shredders” chew and shred paper, cardboard, and leaves, breaking them into smaller pieces that bacteria and fungi can consume.
Other Forest Floor Organisms You’re Likely to See in a Mature Worm Composting System:
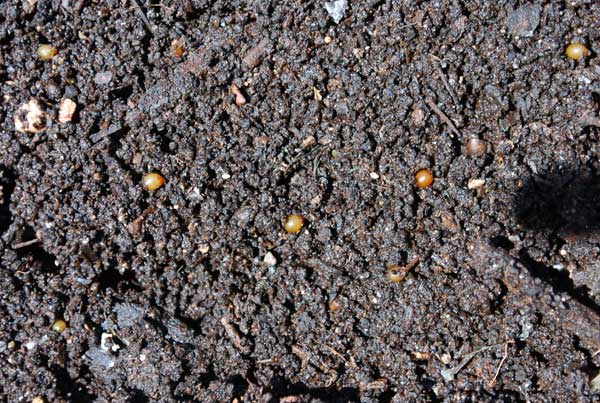
- Enchytreids, also called “potworms”, are small, white cousins of red compost worms. Often seen in saucers under flowerpots, many people mistake them for nematodes, but nematodes are invisible to the naked eye. Potworms are a sign of a healthy container mix.
- Springtails, are tiny white flea-like insects that hop when threatened. They’re often seen near the surface of the bin, especially in the spring.
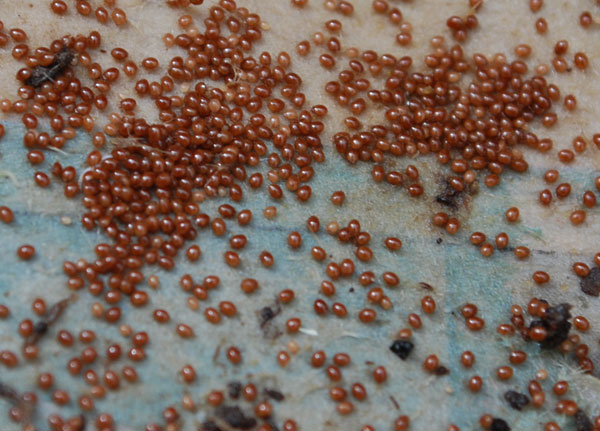
- Orabitid Turtle Mites, like tiny rust-colored beads the size of mustard seeds.
- Slugs like the cool, dark, moist environment of a worm bin. If you see them, they’ll be under the lid, or under the wet newspaper you put on top. You may see their eggs, clear BB-sized spheres clustered together. If you don’t have a lot of tender plants near the bin, they’re harmless. I’ve always got seedlings going somewhere, so I can’t suffer a slug to live. When I see eggs, I smear them with the end of a plant tag.
- Beetle and Fly larvae may also be present. Fungus gnats and fruit flies are common in worm bins, but can be controlled.
- Millipedes and Sow Bugs.
These are some of the compost critters you can see in a mature worm composting system, but there are billions of microscopic bacteria, fungi, protozoa, and nematodes that you can’t see, working their way through the bin.
All of them contribute to the richness of the worm castings you harvest from your worm composting system.
Bins
|
How it Works
|
Getting Started
Feeding Your Worms
|
Troubleshooting
|
Harvesting Castings
Starting a Worm Composting System
Moderation is the most important thing to remember about red compost worms:
- Moderation in temperature—site the bin where it’s not too hot and not too cold.
- Moderation in moisture—the bedding should be neither too wet nor too dry.
- Moderation in feeding—if the worms aren’t eating what you put in last week, cut back on their food this week.
- Moderation in any particular food—too much of even a good thing all at once can go bad.
What You’ll Need to Start Your Worm Composting System
- A Worm Bin, either a Worm Factory 360
.
- Bedding Materials like corrugated cardboard, paper towel and toilet paper tubes, egg cartons, shredded newspaper, and shredded bank statements. Rehydrated coir—dried, ground coconut husk—also makes excellent worm bedding.
- Food, like ends and peels of vegetables, chopped kitchen scraps, coffee grounds and filters and dried, crushed eggshells.
- A Source of Grit, like fine sand, a handful or two of good garden soil, dried eggshells ground in a food processor, or ground oyster shell. Worms have no teeth, and rely on small pieces of grit inside a muscular crop to “chew” their microbial food.
- A Microbial Inoculant, like a handful of good garden soil, a couple handfuls of fresh worm castings from a friend’s active worm bin, and/or, a handful or two of leaf mold dug up from under an old tree.
- Composting Red Worms can be dug up from under any leaf pile, or purchased below, along with any other worm composting supplies you need.
Order Worm Bins, Red Compost Worms, and Worm Bin Supplies
Red compost worms often suffer “transplant shock” when added to a new bin. Most instructions for setting up a worm composting system don’t include a “microbial inoculant”, but the surface shredders, bacteria, nematodes, and fungi found in a handful or two of soil, forest floor duff, or active worm compost provide the supporting cast your worms need to thrive.
I’ve found that the worms adjust much more quickly to their new surroundings if some of their forest floor allies are there to help break the materials down.
If you order your worms the same day you order your worm bin, the worms will arrive first, and you’ll have a problem.
|
|
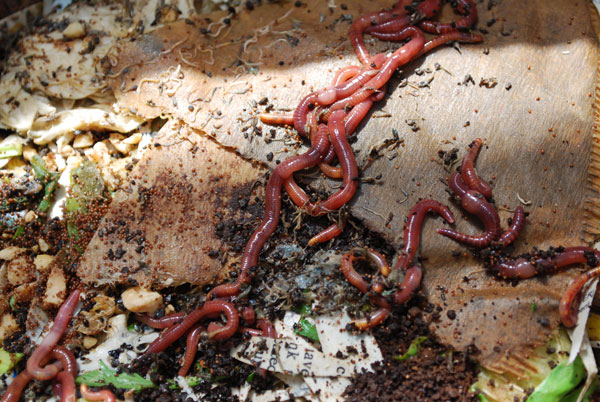
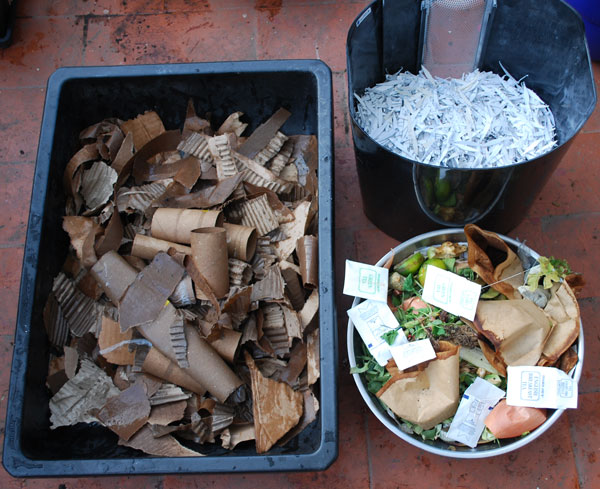
Bedding and Food© Steve Masley …Click IMAGE to Enlarge |
Red compost worms are shipped overnight, and arrive at your door a day or two after you order them. They’re packed in a tiny box, and need to go into a mixture of bedding and food as soon as they arrive.
You can try to time the orders to arrive the same day, but if there’s a shipping delay with your bins, your worms will suffer.
Don’t order your worms until you have a worm bin to put them in.
It’s a good idea to mix the bedding and food for your first worm composting system a few days before your red compost worms arrive. This gives the bin ecosystem time to get established before your worms arrive.
Bedding consists of torn-up corrugated cardboard, toilet paper and paper towel rolls, shredded newspaper, and shredded paper. Bedding provides habitat for your worms, and structure that keeps the castings aerated. It also provides carbon to balance the nitrogen in food scraps.
Most worm bins also come with a brick of coir, or dried, shredded coconut husk.
Coir is an abundant, cheap biproduct of the coconut industry. It soaks up 5 times its weight in water, and makes an excellent addition to worm compost bins, seed starting mixes, container vegetable potting mixes, and sandy soils.
I always keep a couple of coir bricks around as part of a worm bin fix-it kit. I don’t use it in every tray I start (although I do recommend using it in the first tray). In established bins, worms do fine in bedding made with shredded paper and cardboard.
I do use coir to fix problems with fungus gnats or excess acidity—see troubleshooting below.
Food consists of chopped-up kitchen scraps, coffee grounds and filters, and other items from your kitchen waste stream. See feeding your worms for more details on feeding.
Bins
|
How it Works
|
Getting Started
Feeding Your Worms
|
Troubleshooting
|
Harvesting Castings
Siting Your Worm Composting System
Temperature and moisture are critical to the health and vigor of your worm composting system.
|
A Worm Bin Horror Story. I had a client who kept his worm bin out on a sunny balcony through the winter and spring, where it thrived in the warmer temperatures. The population of his 4-bin system grew to extraordinary numbers--upwards of 5,000 worms. Unfortunately, he left it on the sunny balcony when he went camping during the first heat wave of summer, and came back to a horrible mess. It smelled like a combination of road kill and dead fish, and the larger worms, which had fled through the open leachate spigot, had fallen onto the hot brick below, forming a 2” thick, platter-sized latke of dead, dried worms. |
Red compost worms thrive in a temperature range of 55-80° (13-27° C). Bin temperature is usually 10° (6° C) cooler than air temperature in summer, and 10° (6° C) warmer than air temperature in winter.
The mixture of bedding and food should have about 50% moisture, like a wrung-out sponge. If you squeeze a handful—after picking out all the worms, of course!—only a drop or two of moisture should drip out.
If your worm composting system stays consistently above or below these temperature ranges, you’re going to have problems.
At the low end of this range, worms go into a semi-dormant state, and eat very little. If the air temperature stays below 25° (-4° C), they freeze and die, so protect your worm composting system from sub-freezing temperatures.
At the upper end of this range, worm populations climb rapidly, oxygen is used up more quickly, and problems with increased acidity arise, especially in a crowded bin. At bin temperatures above 80° (27° C), your worm composting system can go south in a hurry—see sidebar.
Some sun on the bin is usually okay from late fall to mid-spring, but make sure you move the bin to full shade once it starts warming up toward summer.
Keep the bin covered to prevent rain from flooding it.
Bins
|
How it Works
|
Getting Started
Feeding Your Worms
|
Troubleshooting
|
Harvesting Castings
Step-by-Step Instructions for Starting a Worm Composting Bin:
- Soak the coir brick that comes with the bin in a large bowl or bucket with a gallon of water. It will swell as it soaks up water. After a few minutes, break up any chunks to speed up the process.
- Tear corrugated cardboard up into palm-sized pieces. (This is easier if you throw a box in the shower for 20 seconds, then flip it and wet the other side. Let it sit for 5-10 minutes, then tear it up). Tear up enough to fill half the tray, then soak with toilet paper and paper towel tubes in a bucket of water for 5 minutes.
- Dip 2 full sheets of newspaper in water to moisten, and fold them to fit over the bottom of the bin while the cardboard and coir are soaking. This will keep castings from dropping through the bottom at the start.
- Chop kitchen scraps up into small pieces. (Chopping isn’t absolutely necessary, but it speeds up composting and is highly recommended for your first tray.) In a large bowl or bucket, mix the scraps with an equal amount of dry shredded bank statements or newspaper.
- Lift the cardboard out of the water and place it in the bin.
- Mix the food/shredded paper mixture into the cardboard. If you’re using coir, add it at this time as well.
- Spread a handful of good garden soil, and/or fresh worm castings from an active worm bin, over the surface. If you live near old trees, dig up a couple handfuls of leaf mould or duff from under the trees, and spread it over the surface as well.
- Mix everything together with your hands. Your worm bin is now ready for your worms.
- Dip 2 full sheets of newspaper in the cardboard soaking water to wet the paper, then spread it out on top of the bedding. Fold the edges so the damp paper forms a cap over the entire surface. The newspaper holds in moisture, makes it more difficult for fungus gnats and fruit flies to lay eggs in the castings, and provides a cool, dark shelter for your worms.
- As soon as your worms arrive, remove the damp newspaper from the top of the bin. Open the box and carefully shake the worms out over the surface of the bin. They may be balled up into a big mass that plops out into the bin, but that’s okay, they’ll spread out and make their way down into the bedding on their own.
- Replace the damp newspaper “cap” for the bin.
- Don’t feed them again until the bin ecosystem kicks in and castings start accumulating under the newspaper.
Download Printable Step-By-Step Instructions
for Setting Up a Worm Bin
Don’t Overfeed
Overfeeding is the most common mistake people make when starting a worm composting system.
One pound of composting red worms is about 1,000 worms. The rule of thumb is ‘1lb of red compost worms will eat its own weight in food and bedding every week’.
Like many “rules of thumb”, this is an approximation, an average.
Worms eat less in fall and winter, when the nights are long and the days are cool, and more in the spring and summer, when it’s hot during the day and warm at night.
Worms also eat less when getting established in a new bin. Sometimes, a lot less. Don’t overfeed the first month after starting a new worm bin, especially if you’re starting the bin in the fall or winter.
The way you gauge how much food to give your worms is by how much is left of the food you put in the last time you fed them.
Bins
|
How it Works
|
Getting Started
Feeding Your Worms
|
Troubleshooting
|
Harvesting Castings
Feeding Your Worms
If there is a single rule that governs how you feed your compost worms, it’s moderation.
Excessive amounts of any particular food all at once—even foods worms normally love—will create problems in your worm composting system.
| Materials to Avoid | Use in Small Amounts | Foods Worms Like |
|---|---|---|
|
|
|
Plants protect seed formation by making peels hostile ground for bacteria and fungi.
Carrot peels are strongly anti-fungal, and citrus peels contain citrus terpenes that can only be broken down by blue-green molds. Onion and garlic peels are strongly anti-bacterial and anti-fungal.
Since bacteria and fungi are the main diet of red compost worms, don’t overload your bins with peelings.
Peels from a few potatoes are fine, but don’t try running all the potato peels from mashed potatoes for Thanksgiving dinner for 10 through your worm composting system at the same time. They’ll ferment, and alcohol kills worms.
A few lemon or lime halves thrown into your worm bin now and then won’t be a problem, but don’t dump a pail of lime rinds from a mojito party into the bin.
Some people insist you should never put citrus in a worm bin, or even a compost pile, but once blue-green molds have broken down the terpenes in the peel, other organisms can break down what’s left. Worms actually eat blue-green molds, so a few citrus halves won’t hurt them.
Inorganic materials—like plastic, glass, and metal—obviously won’t break down, and should be avoided. I usually avoid materials (like avocado pits and shells, and peach pits) that take more than 1 cycle to break down in a worm composting system. I get tired of picking them out when I harvest castings.
Worms have very sensitive skin, and will avoid salty or vinegary materials. If you scoop up a small handful of worm castings and see them writhing on your palm, it’s because of the salt in your sweat.
Salty and vinegary materials inhibit bacteria and fungi in a worm composting system, so pickles are a no-no.
Meat scraps and excessive dairy products will attract flies. Experienced worm composters can add them to established bins in small amounts, but beginners should avoid them.
Bins
|
How it Works
|
Getting Started
Feeding Your Worms
|
Troubleshooting
|
Harvesting Castings
Getting the Right Ratio of Bedding to Food in a Worm Composting System
Worms graze on the bacteria and fungi that thrive in the mixture of bedding and food scraps you provide for them.
Kitchen scraps contain a lot of nitrogen, and have to be balanced by high-carbon materials like shredded paper or cardboard in a worm composting system.
Most problems with odors, flies, or worms that fail to thrive arise from excess nitrogen in the worm bin.
Use a 50-50 mixture of finely-shredded paper and chopped kitchen scraps when you feed your worms. Shredded newspaper works, but machine-shredded bank statements and pre-approved credit card offers are even better.
Mix the bedding and scraps together in a large bowl, instead of layering them on separately.
Bins
|
How it Works
|
Getting Started
Feeding Your Worms
|
Troubleshooting
|
Harvesting Castings
To Chop, or Not to Chop: Particle Size in a Worm Composting System
Chopping kitchen scraps into small pieces results in a more even breakdown, and faster conversion into worm castings.
It’s not necessary, but if you don’t chop, you may have to fish out larger pieces that haven’t broken down when you harvest the castings, and run them back through the bin another time.
Sheet Feeding vs. Pocket Feeding
Sheet feeding and pocket feeding are two different approaches to feeding your worms.
In sheet feeding, the mixture of bedding and food is spread in an even layer over the top of the worm bin. This mimics natural ecosystems, where falling leaves or collapsed grass stalks form a layer over the ground, and the worms live and feed underneath.
In Pocket Feeding, you dig a hole big enough to accommodate bedding and food in one part of the bin, bury the food, then dig in another part of the bin the next time you feed your worms.
Both methods work fine in a worm composting system, but sheet feeding is easier. You don’t have to dig into the castings, you just mix the food and bedding together and spread it over the surface.
In a simple tote worm bin, pocket feeding may make harvesting worm castings easier. Worms will move into a pocket of food in one corner of the bin, allowing you to harvest castings from the rest of the bin.
Bins
|
How it Works
|
Getting Started
Feeding Your Worms
|
Troubleshooting
|
Harvesting Castings
Harvesting Worm Castings
 |
|
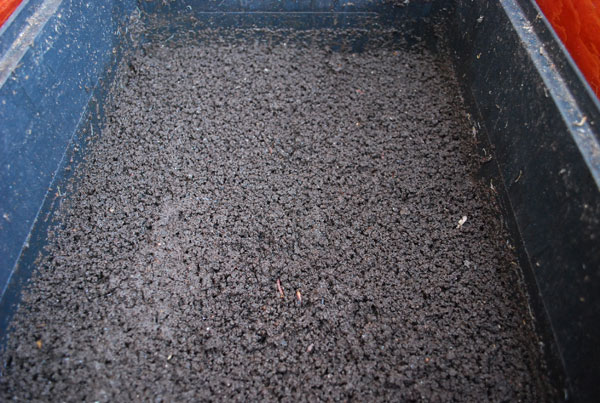
Ready to Harvest © Steve Masley …Click IMAGE to Enlarge |
When the castings in your worm composting system form a uniform, black mass, it’s time to harvest the tray.
If the castings are wet and muddy, you may want to reverse the trays for a few days, putting the bottom tray on top, and moving the other trays down. This allows excess moisture to drain down into the other trays, and makes the castings easier to handle.
Once they've dried a little, dump the tray to be harvested onto a small tarp or into a concrete mixing tub. Scrape the sides of the bin with a butter knife or the edge of a putty knife, and add to the pile. Scrape the bottom of the tray, being careful to avoid slicing any worms hanging through the grid in half.
Contrary to popular belief, cutting a worm in two will produce two halves of a dead worm, not two new worms (this works with microscopic flatworms, not red compost worms).
Comb your fingers (or a hand cultivator) through the castings to break them up and aerate them. Pick out any large pieces that haven’t broken down, and add them to a new tray, along with any larger breeder worms that may still be in the castings.
Leave smaller worms in the castings. They’ll form a small population of worms in whatever container mix you add them to.
Bins
|
How it Works
|
Getting Started
Feeding Your Worms
|
Troubleshooting
|
Harvesting Castings
Harvesting a Simple Tote Worm Bin
To harvest worm castings from a simple tote worm bin or box, spread a tarp on the ground on a warm, sunny day, and wet it down with a hose. Wetting the tarp prevents worms from sticking to it.
 |
|
Several Small Mounds © Steve Masley …Click IMAGE to Enlarge |
Dump the contents of the bin onto the tarp. Pick out any large pieces that aren’t broken down, and place them in a small bucket.
Separate the castings into several small cones, and leave in the sun for half an hour. The worms will migrate down into each mound.
Starting at the top, scrape the castings into a second, larger bucket, peeling off an inch or so of the mound at a time. When you start encountering lots of worms, stop. Let the sun drive them further down into the mound.
After 15 minutes, go back and scrape more castings into the bucket, an inch at a time.
When you get down to the last inch or two, you’ll find most of the worms. Sometimes several hundred. Carefully scoop them up and place them in a new tray or worm composting bin.

|
|
the Bottom of Each Mound© Steve Masley …Click IMAGE to Enlarge |
Use worm castings in container vegetable potting mixes, houseplants, or around vegetable plants in your garden.
Store unused worm castings in simple tote worm bin, or a bucket with several folds of wet newpaper or a piece of wet cardboard or burlap on top.
DO NOT seal the bucket with a tight-fitting lid—unless you want to be greeted by a horrible smell the next time you open it.
Worm castings are alive, and the organisms in them require air and moisture to survive. (If you drill several holes for ventilation high up in the side of the bucket, you can seal it with a tight lid).
Use stored worm castings within a week or two, if possible. Worm castings that aren’t kept moist by a steady influx of kitchen scraps will dry out, and the organisms in them will die or go dormant. They’re still a great organic fertilizer if they do dry out, but their value as microbial inoculants declines.
Bins
|
How it Works
|
Getting Started
Feeding Your Worms
|
Troubleshooting
|
Harvesting Castings
Troubleshooting a Worm Composting System
Here are some basic worm composting system adjustments for common problems:
- Adjust the moisture level by adding dry, shredded paper to a bin that’s too wet, or fresh vegetable scraps, wet cardboard, or moistened coir to a bin that’s too dry.
- To reduce odors, aerate the worm castings using a hand cultivating claw to lift and turn the contents.
- To reduce acidity, add ground oyster shell or dried, crushed eggshells.
- To reduce fungus gnat and fruit fly problems, add a layer of rehydrated coir to the surface.
Coir and ground oyster shell (or dried, ground eggshells) are two items you might want to have in your worm composting system fix-it kit.
| Problem | Probable Cause | How To Correct |
|---|---|---|
Crowded bins are more likely to become excessively acidic or go anaerobic, especially in hot weather. Reduce the worm population by giving a pound of worms to someone who’s starting a worm composting system. If you have chickens, (or know someone who does) feed excess worms to the birds. Aerate the castings by turning them with a hand cultivator (garden claw). This also cools them if they’re too warm. If excess acidity is suspected, add 1/2-3/4 cup of ground oyster shell or dried, crushed eggshells and cultivate in. |
||
| Worms escaping bin in small numbers | Bin is too dry. | As the bin dries out, worms start trying to escape. Mix rehydrated coir or soaked cardboard into castings. Add chopped, leafy greens and succulent stalks to increase moisture content. Even under ideal conditions, there are always a few “adventurous” worms that escape from the bin. |
| Foul odors | Anaerobic pockets or conditions. | Avoid dense, high-nitrogen materials like meat scraps or dairy products. Add additional carbon materials. Turn and aerate the castings with a garden claw. |
| Maggots (housefly larvae) | Excess nitrogen. | Flies lay eggs whereever they find enough nitrogen to support their young. Avoid putting meat scraps in worm bins, unless you really know what you’re doing. If enough carbon is present in your worm composting system, bacteria overrun the food source before any eggs can hatch. Add shredded paper and/or rehydrated coir to balance excess nitrogen with additional carbon. Increase the ratio of bedding to food when you feed your worms. |
| Small maggots | Fungus gnats or fruit flies. | A few fungus gnat and/or fruit fly maggots are not a problem in most worm bins—unless they’re indoors, where they’re harmless but annoying. Spread 1/2-3/4 cup of ground oyster shell or dried, ground eggshells over the castings, and aerate them with a garden claw. This will reduce acidity and make the bin less hospitable for gnats and flies. Lay down a 1/2-3/4” layer of rehydrated coir over the top of the castings, and press it down with the palm of your hand. Put the newspaper back in place and press the edges down into, but not through, the coir layer. This makes it difficult for adult flies to lay eggs in the castings, and for newly-hatched flies to escape. |
| Only a few large worms present | Bin is too dry, insufficient food. | A too-dry bin is the likely problem, insufficient food less likely. Both can be solved by adding chopped spinach, lettuce, or cabbage leaves and succulent stalks. Mix with shredded paper in a 2:1 ratio. |
Page Navigation
|
Order Worm Bins, Red Compost Worms, and Supplies
How to Compost
|
Compost Ingredients
|
Composting Basics
Build a Compost Pile
|
Hot Composting


Copyright © 2009-2020, by Steve Masley, Grow-it-Organically.com
All rights reserved
![]()
HOME | About Us | Contact Us | Privacy
New! Comments
Have a question or comment about what you just read? Leave me a comment in the box below.